
The Custom Workflows feature inside MetaDefender Cloud, available to all commercial users, allows security leaders to create tailored file handling policies, aligned with their risk factors.
What’s more, once they’re set up, custom workflows adapt to the organization’s specific compliance requirements, and operational context, rather than applying a uniform approach regardless of the use case.
Here’s how to set up and use workflows to their fullest potential.
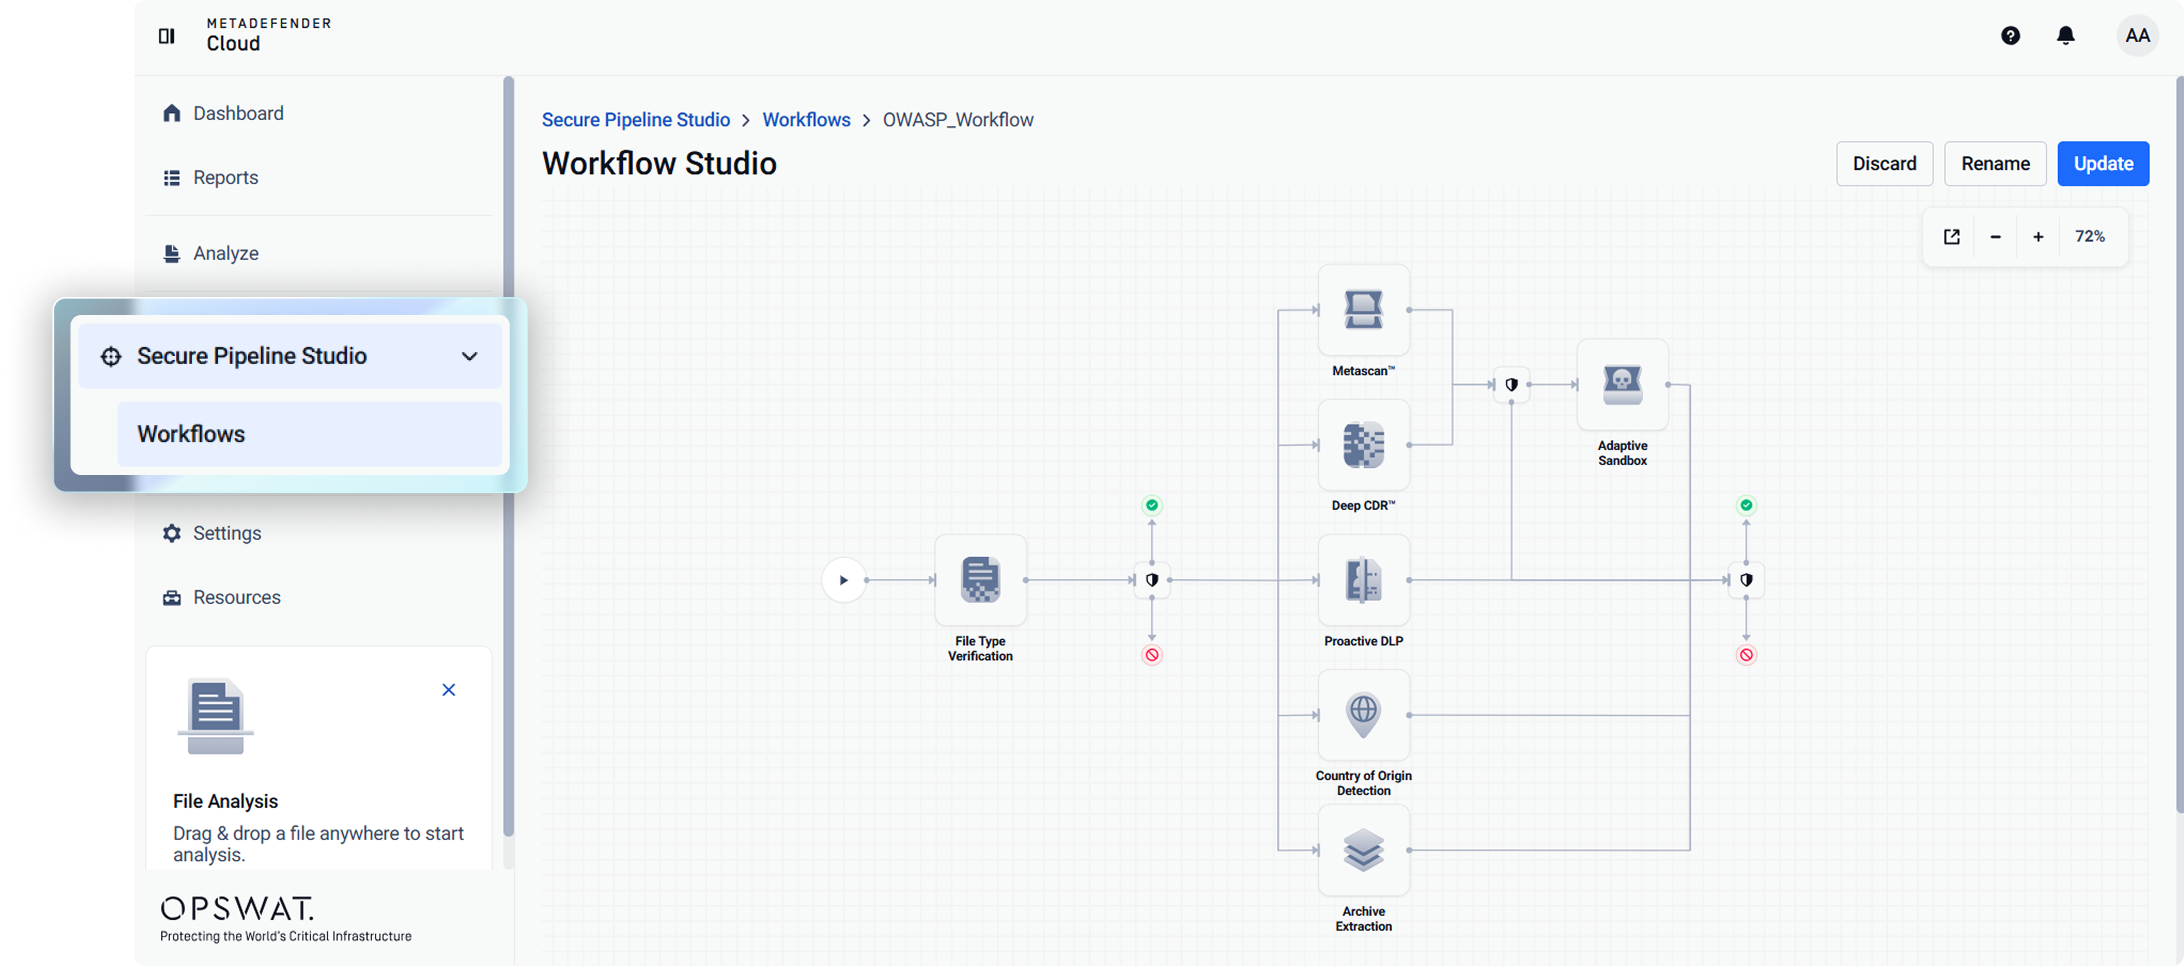
What Are Custom Workflows?
The Custom Workflows feature in MetaDefender Cloud™ lets users design their own file inspection and handling processes, replacing previously predefined processing logic.
Users can configure workflows based on file attributes, security operations, and organizational policies.
In practice, the feature works across five dimensions:
File type controls: block unwanted or suspicious files from the get-go, without running them through all file security steps in MetaDefender Cloud.
File handling rules: set limits on file size, archive recursion depth, child file count, or use file hash/type as an allow/block criterion
Conditional security operations: preserve resources by enabling or disabling security layers (AV, CDR, sandboxing) on a case-by-case basis; set rules that chain them together (e.g. trigger sandboxing only if Metascan detects malware)
Deep CDR options: run CDR in analysis-only mode or configure sanitization per file type
Proactive DLP configuration: enable detection for specific identifiers (IBAN, SWIFT) or define custom PII patterns
Integration-dependent flows: set workflows based on a specific integration type (API, SharePoint, OneDrive, etc.), so different environments can follow different logic.
How to Create a Custom Workflow Step-by-Step
Step 1 – Find Engines inside the Secure Pipeline Section in MetaDefender Cloud
*note: you must be logged in under a Commercial Tier to access this feature.
Through the MetaDefender Cloud dashboard, select the Secure Pipeline Studio tab, and select Engines.
Step 2 - Create a New Profile
You'll find the New Profile options in the main menu.
Setup
Here’s where you’ll setup all configurations. Create the profile and fill in the description.
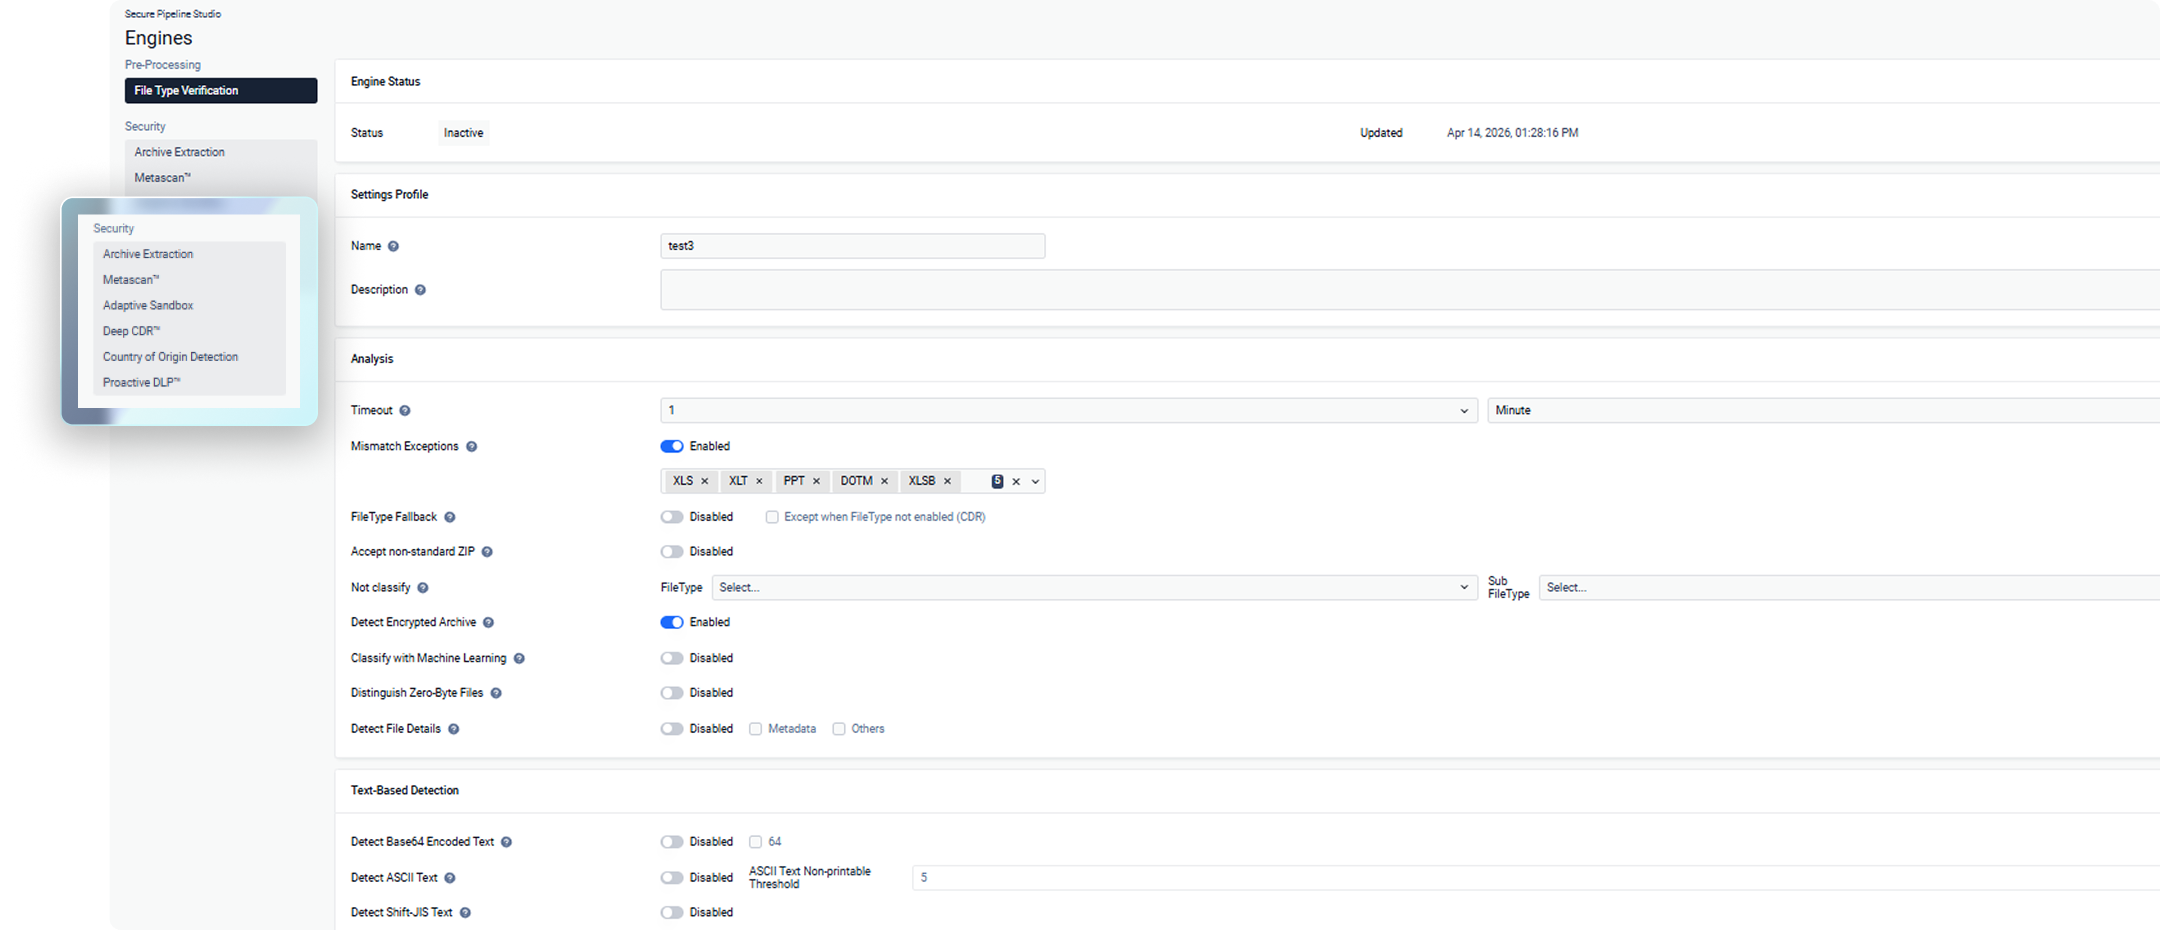
Step 3 – Start Configuring
In the Security tab, you can start configuring, based on features and technologies. Some settings are pre-configured by default, so take your time to walk through each of them and customize based on your specific use case.
Note: the profile you just created needs to be active.
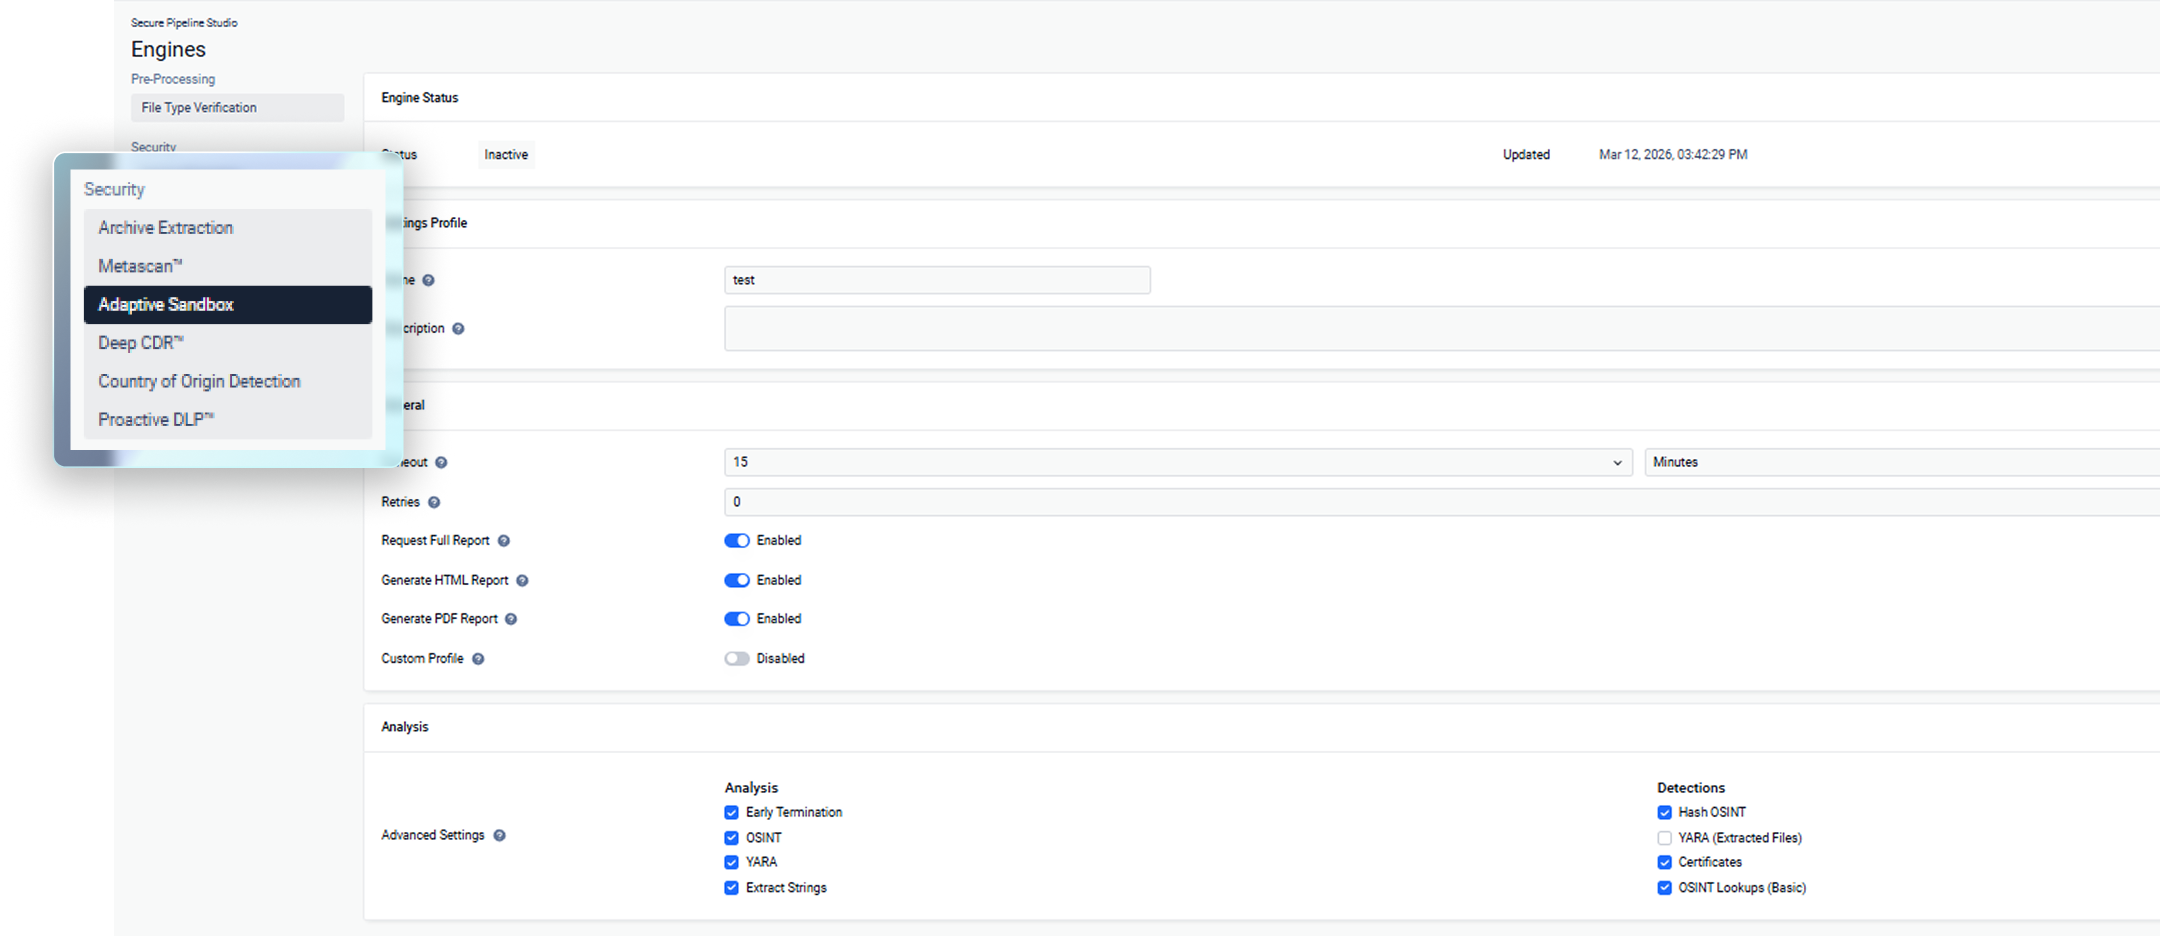
Archive Extraction
Extraction timeouts, Office document extraction, recursion limits, archive size limits, extraction error handling, HTML content type matching, and VMDK handling.
Metascan™
Per-engine timeouts, engine retries, infection and suspicious file thresholds, failure thresholds, and antivirus engine selection.
Adaptive Sandbox
Analysis timeouts, retry behavior, report generation options, custom profiles, advanced analysis features, detection methods, YARA scanning, string extraction, certificate analysis, and OSINT lookups.
Deep CDR™
Supported file types, sanitization timeouts, retry behavior, password retention options, analysis mode, sanitization detail reporting, processed object handling, and binary object limits.
Country of Origin Detection
Lookup times and retries.
Proactive DLP™
Profile details, timeouts, retry behavior, output filename formats, encoding detection, OCR and recursive detection options, secret detection categories, personal document detection, export settings, anonymization, DICOM and PCAP processing, and watermark configuration.
Once you’re happy with your configurations from one tab, you can move on to the other. When you’re finished, save your profile.
Step 4 – Import Profile Setting into the Workflow Tab
Workflow tab
Move to the workflow tab.
Apply profile
Click on each corresponding step and import the settings from the previous step. When done, click Apply.
Step 5 – Define Rules in Conditional Nodes
Conditional logic
In the conditional node section, you can configure allow/block rules for mime-types and file-types, as well as event- or verdict-based trigger to enable multiscanning.
Why Custom Workflows Matter
The core idea behind the feature is allowing users to create security policies which match their organizations’ specific risks factors, moving away from static, one-size-fits-all scanning policies.
In real-world scenarios, this means:
Different environments get different rules; since an API integration and a SharePoint upload don’t carry the same risk, the custom workflow feature lets you treat them differently.
Security steps trigger only when warranted, reducing processing time without lowering the security bar.
Enforcement is automatic and consistent; once configured, policies apply across every file interaction with no manual intervention. Useful at scale across multiple integrations.
No engineering dependency as conditional logic and module configuration are UI-driven. SOC teams can own and adjust workflows without involving developers.
Coverage goes beyond basic scanning: through the same workflows, file type spoofing, structural integrity, DLP for specific data patterns, and archive handling are all configurable.
Get Started
Custom Workflows are available across all MetaDefender Cloud™ commercial tiers.
Sign in, open Secure Pipeline Studio, and start building policies that actually reflect how your organization operates.
FAQ
1. Who can use Custom Workflows in MetaDefender Cloud?
Custom Workflows are available to organizations with an active MetaDefender Cloud Commercial Tier subscription. Users can access and manage workflows through Secure Pipeline Studio.
2. How do Custom Workflows support risk-based file processing?
Custom Workflows allow organizations to create file security policies based on file attributes, integration sources, security inspection results, and organizational requirements. This enables different files and environments to follow different security processes instead of a one-size-fits-all approach.
3. Can I block risky file types before they go through all security checks?
Yes. Custom Workflows can block unwanted, unsupported, or high-risk file types before they proceed through additional security processing stages, helping reduce risk and conserve resources.
4. Can sandbox analysis run only when deeper file inspection is needed?
Yes. Custom Workflows support conditional security operations, allowing organizations to trigger sandbox analysis only when files meet predefined criteria, such as suspicious behavior indicators, unknown file characteristics, or specific risk thresholds.
5. Can Deep CDR™ analyze files while preserving their usability?
Yes. Deep CDR™ reconstructs files by removing potentially malicious active content while preserving the original file’s functionality.
6. How do Custom Workflows handle large or nested archive files?
Administrators can define archive processing policies, including maximum recursion depth, child file limits, archive size thresholds, and extraction behavior, helping control how complex archives are inspected.
7. Can workflows help detect sensitive data or custom PII patterns?
Yes. Through Proactive DLP™, Custom Workflows can identify sensitive information such as personal data, financial information, identification documents, and organization-specific patterns, helping support compliance and data protection initiatives.
8. Can security teams manage Custom Workflows without developer support?
Yes. Custom Workflows are configured through the MetaDefender Cloud user interface, enabling security and SOC teams to create, modify, and manage policies without writing code.
9. Do Custom Workflows apply automatically once they are configured?
Yes. After workflow profiles are configured and applied, the associated rules are enforced automatically for all files that match the defined conditions and policies.